Canva is a graphic design tool based on cloud service. You can use its diverse features to create assets, like social media images, videos, presentations, posters, and so on. As a good helper to simplify your digital design, Canva has become more and more popular. If you are one of its users and wonder how to add Spotify music to Canva, this page is definitely worth checking out. It is the most comprehensive and useful guidance to tell you how to add Spotify music to video on Canva. No matter whether you use iOS, Android, Mac, or Windows, this post can match your devices and help you achieve your goal easily.
Part 1. Can I Add Music to Canva Video from Spotify?
Background music is a vital part of your design. You may want to add your preferred tracks from Spotify to your video or presentation on Canva. Is it possible? Well, Canva does allow you to upload media files from your device to enrich your design. But you will find that it doesn’t work when you try to do so for Spotify music. That is because all the songs you download from Spotify are protected and limited by the digital rights management rules imposed by the publishers. Even though you download them, you can only play them with the Spotify app, not to mention import them to other applications or platforms.
Luckily, this is not the problem that defies solution. Since you are not entitled to add Spotify music to Canva directly, you can take a roundabout way to reach it. All you need is a powerful third-party tool that can give you assistance in shedding the limits of DRM protection and turning the downloaded Spotify music files into general local files. AudBite Spotify Music Converter is a great utility to do so. All you want, it does for you.
AudBite program’s advanced decoding technology allows it to remove the DRM protection easily. Therefore, it’s a piece of cake for you to download all the Spotify songs, playlists, and albums on your local computer. Furthermore, you can utilize it to convert the downloads to other audio formats that are in common use. The supported formats include MP3, AAC, FLAC, WAV, M4A, and M4B. After conversion, feel free to transfer the local music files to other apps like InShot, iMovie, TikTok, and Canva. To save your time, this smart program allows you to download and convert music in batches at 5X faster speed. Since it also keeps the ID3 tags and the original sound quality, you will be able to enjoy the same music experience as online.
Main Features of AudBite Spotify Music Converter
- Download ad-free songs from Spotify without premium easily
- Convert Spotify to M4A, MP3, AAC, M4B, WAV, and FLAC
- Save Spotify music up to 320kpbs and with ID3 tags retained
- Support downloading Spotify music in batch at 5× faster speed
Part 2. How to Convert Spotify Music for Canva
AudBite Spotify Music Converter has two versions, and users of Windows and Mac can both find the suitable one. After downloading it on your computer, please check out the guidance below to download and convert the Spotify music you like.
Step 1
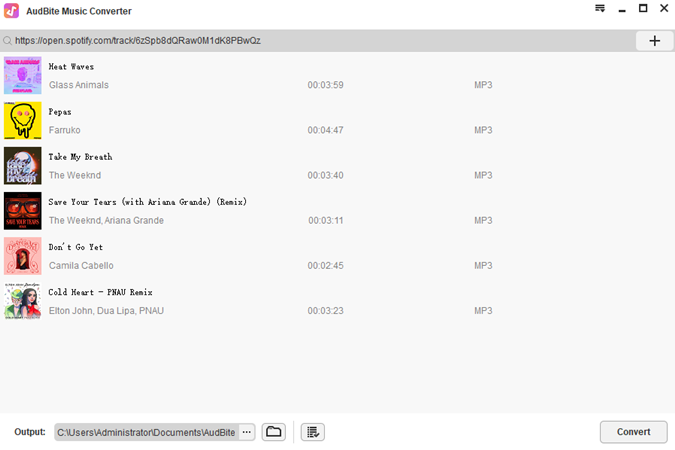
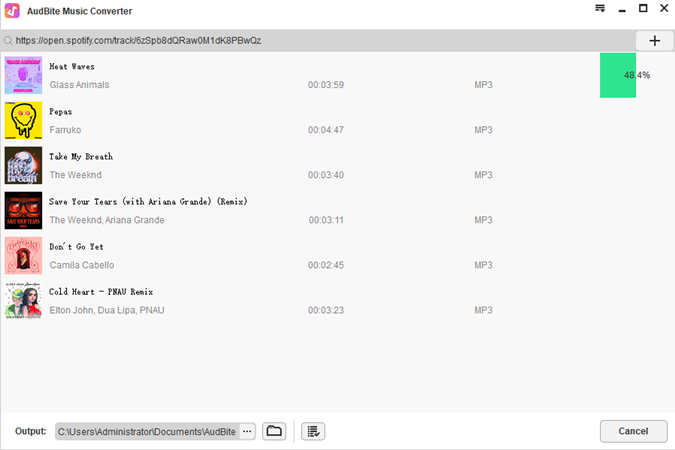
Step 1Fire up the AudBite program on your desktop, then the Spotify app will open simultaneously. Use your account to log in and find the track you wish to import to Canva. Then, directly drag and drop it to the program. Alternatively, you can copy and paste the track link into the program’s search bar and hit the add icon next to it. Thus, the track will be recognized and added to the program.
Step 2
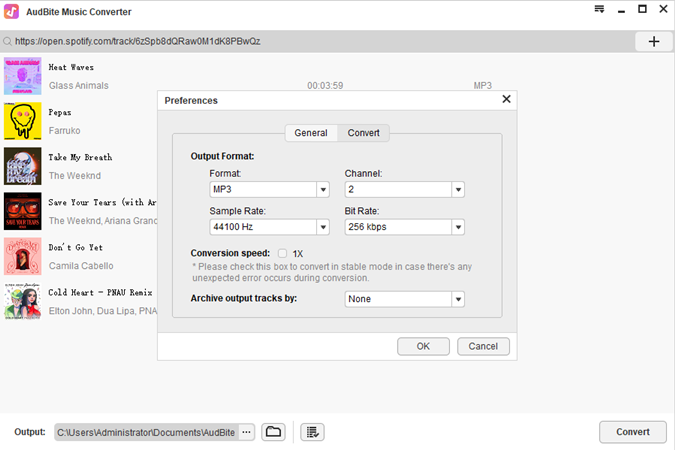
Step 2Before you start downloading and converting, you should make the Spotify music compatible with Canva. Therefore, you need to adjust the output parameters. Click the menu icon at the upper right corner, then select Preferences > Convert. Now choose one suitable output format, and you can adjust other settings like channel, bit rate, and sample rate to enhance your music enjoyment.
Step 3
Step 3Now you are fully prepared. Click the Convert button at the interface of the program and wait for a while. The program will automatically begin downloading and converting. Once it is finished, you can hit the Converted icon to browse all the downloaded files.
Part 3. How to Add Music to Canva from Spotify
Congratulations! You download and save the DRM-free Spotify music files successfully on your computer. It’s high time to import them to Canva for use. In case you are not familiar with Canva, we presented the complete tutorial below for your reference. You can follow it step by step. First of all, you need to install the Canva app on your device. It is available for iOS, Android, Windows, and Mac.
• On Windows/Mac
Step 1. Run the Canva app on your desktop and log in with your account. If it’s the first time you use Canva, you can register one account with your email address.
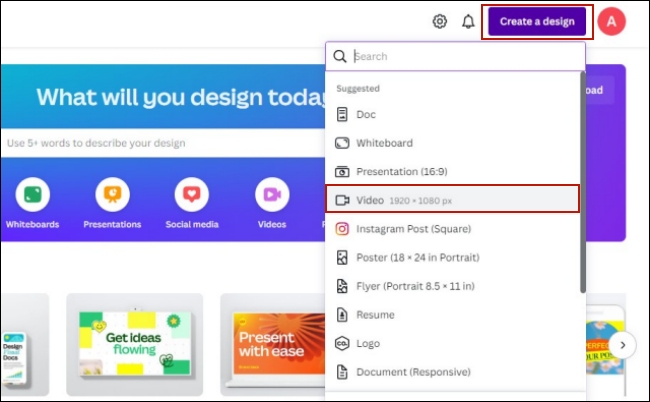
Step 2. Move your cursor to the top right corner of the main screen, then click Create a design > Video to make a new video.
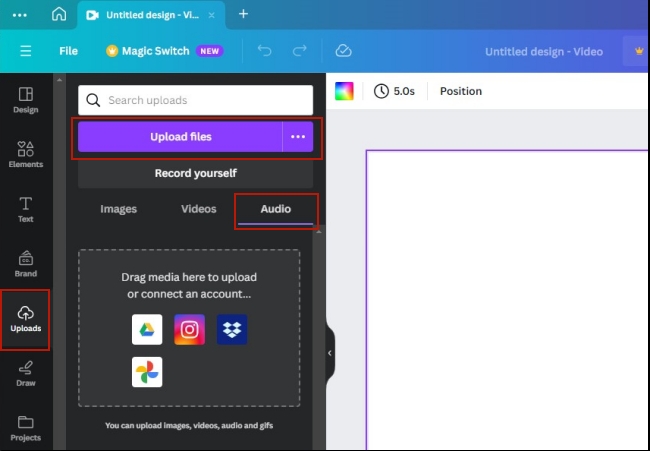
Step 3. Choose Uploads at the left toolbar. Then, select Audio and click the Upload files button.
Step 4. You will be led to the File Explorer on your computer. You should choose the downloaded Spotify music file and double-click it to upload it to Canva.
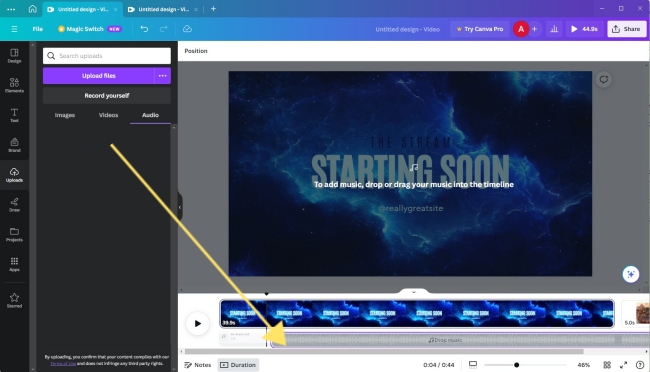
Step 5. Once it is uploaded, you can drag and drop the Spotify music to the timeline. Then it will be added to your video design.
• On iPhone/Android
Sync downloaded Spotify music to iPhone
Step 1. Open iTunes on your desktop, then click File > Add File to Library. Select the downloaded Spotify music and click Open to add it to your iTunes library.
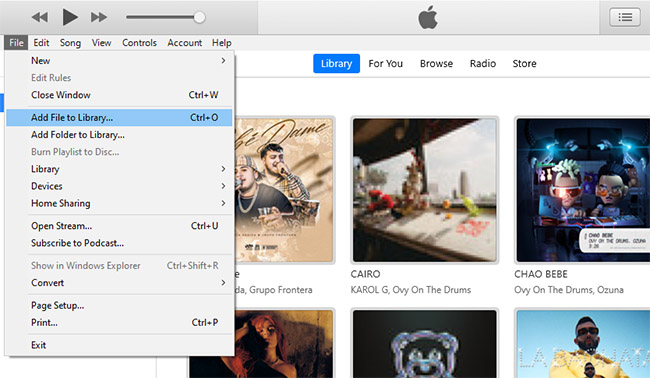
Step 2. Connect your iPhone to your computer via a USB cable.
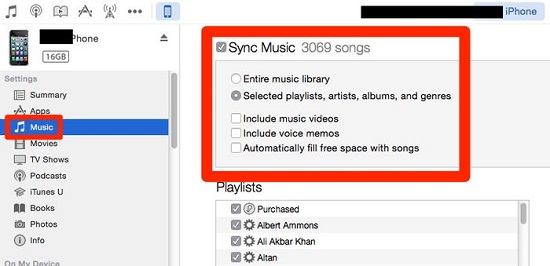
Step 3. Go back to iTunes, and click the device icon at the top to select your device.
Step 4. Click Music at the left bar, then choose Sync Music > Entire Music library. So, the music will be synced to your iPhone.
Sync downloaded Spotify music to Android
Step 1. Use a USB cable to make a connection between your Android device and your computer.
Step 2. Open the File Explorer or Finder on your computer, copy the downloads, and paste it into your Android’s Internal storage folder.
Upload downloaded Spotify music to Canva on iPhone/Android
Step 1. Launch the Canva app on your iPhone or Android device and log in to your account.
Step 2. Click the Add icon at the middle bottom of the main screen. Then choose Video.
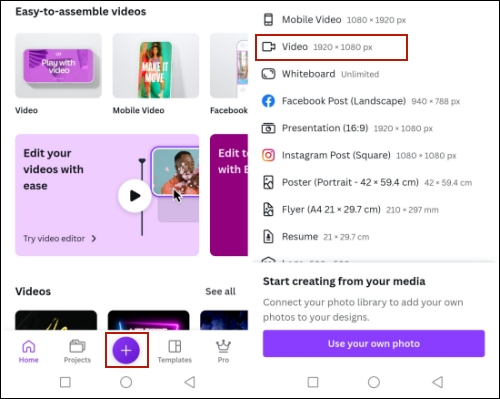
Step 3. After entering the edit screen, tap the Add icon at the lower left corner. Next, choose Uploads > Audio > Upload files.
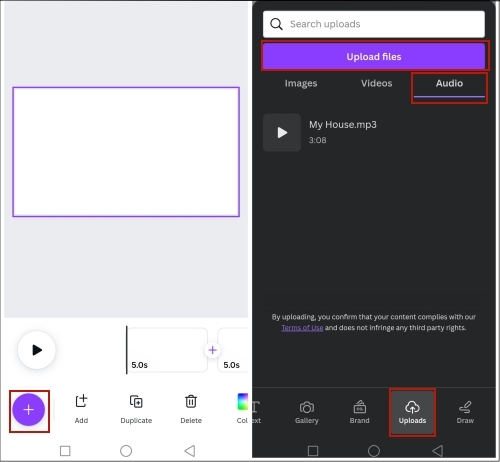
Step 4. Browse all music files on your device and choose the converted Spotify music to upload it to Canva.
Step 5. Tap it and you can add it to your video.
Part 4. FAQs about How to Add Music to Canva
Q1: What kind of audio files can you upload to Canva?
A: Canva allows you to upload audio files in these formats: M4A, MP3, OGG, WAV, or WEBM. You should notice that the audio file size should be no more than 250MB.
Q2: Is there a storage limit for uploads?
A: For free users, Canva allows you to upload up to 5GB of media. If you use Canva for Education or Canva for Nonprofits, you can upload files up to 100GB. Canva Pro and Canva for Trams users have a storage space of 1TB.
Q3: Can I edit Spotify music on Canva?
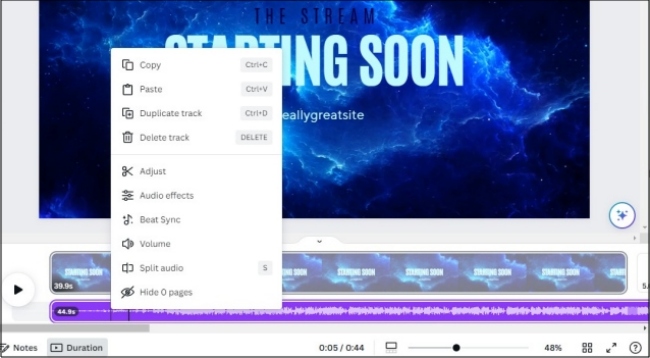
A: Yes, you can adjust and edit the music as you want. You just need to choose the music at the timeline, and then right-click it. Thus, you can choose different operations to edit it, like adjusting the volume, adding some effects, or cutting it.
Part 5. Final Words
See, it is not very difficult to fix the problem of how to add Spotify music to Canva. Things will become much easier as long as you choose the right tool. With AudBite Spotify Music Converter, you can download any Spotify track or playlist you like and save them as a normal audio file on your computer permanently. What’s more, you can utilize this powerful program to convert them to formats like MP3, M4A, and WAV which can be added to Canva easily.


