Background music is an important element of every video. Video editors use music to create a special feel for the audience. This is where music streaming platforms like Spotify come in handy, especially for those that use Final Cut Pro. This software has fast become a pro editing giant that editors are now on the lookout for the best ways to add Spotify music to Final Cut Pro.

If you have ever assumed that adding music to videos is easy, you probably have never tried to add your favorite Spotify songs to video editors. Although adding music from Spotify to Final Cut Pro can be quite a task, this article brings you good news. You are set to learn how to add Spotify music to Final Cut Pro in a fast and easy way.
- Part 1. Way to Download Spotify Songs for Final Cut Pro
- Part 2. How to Transfer Spotify Songs to Final Cut Pro
- Part 3. Conclusion
Part 1. How to Download Songs from Spotify to MP3
Spotify is a subscription-based music streaming platform that allows you to listen to millions of songs through the Spotify app or web player. When you pay for the premium plan, you can download Spotify songs for offline listening, but they remain in the Ogg Vorbis format, which is encrypted with a technology that doesn’t allow you to play the song outside the app.
Because Spotify has a wide range of songs, it is a choice application for video editors who wish to find music for use in Final Cut Pro. This, however, means that you need an external music converter to edit Spotify music in Final Cut Pro. For this purpose, we recommend AudBite Spotify Music Converter as the best option for a hassle-free way to get your desired songs in the right format for video editing.
Main Features of AudBite Spotify Music Converter
- Download ad-free songs from Spotify without premium easily
- Convert Spotify music to MP3, AAC, WAV, FLAC, M4A, M4B
- Save Spotify music up to 320kpbs and with ID3 tags retained
- Support downloading Spotify music in batch at 5× faster speed
With AudBite Spotify Music Converter, you can convert Spotify songs to widely-used formats like MP3, WAV, and AAC then edit Spotify music with Final Cut Pro. Below is a step-by-step guide to downloading Spotify music to your computer.
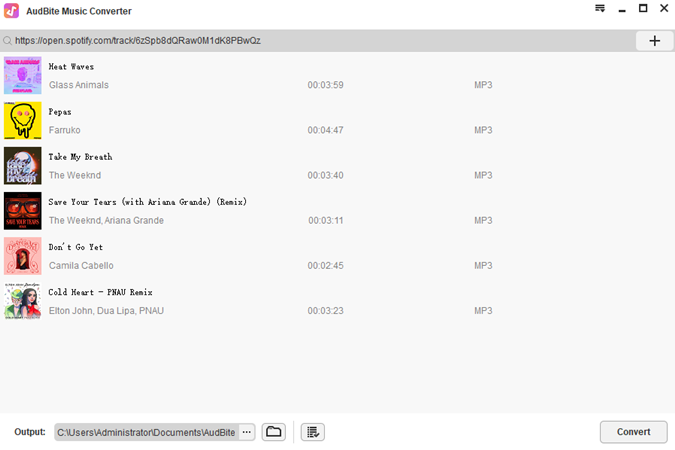
Step 1 Choose Spotify tracks to download
Launch the converter on your computer and then scroll through the homepage of Spotify to surf the music library for the songs, albums, or playlists you wish to download. Once you find the song, drag it to the main interface of the converter. Or copy the URL for the track, playlist, or album and paste it onto the search box. Once done, click on the + icon to load the music.
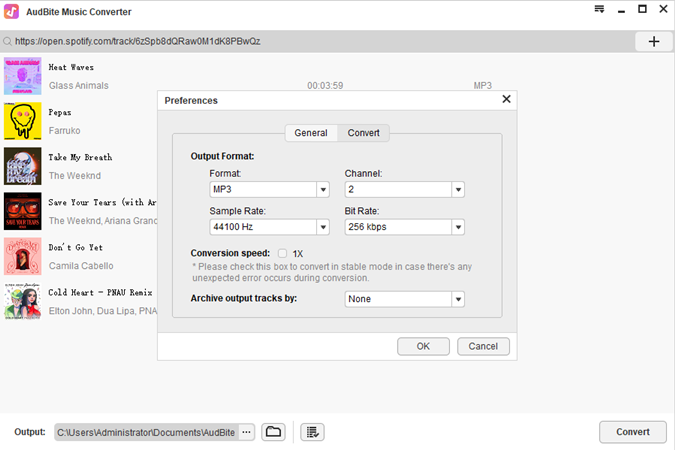
Step 2 Define the output metrics for Spotify
Now, head to the menu bar to select Preferences. Switch to the Convert tab from the pop-up window, then select your desired output format. You could also change the channel, bit rate, and sample rate. The formats available on AudBite software are MP3, AAC, FLAC, WAV, M4A, and M4B. You also have the choice to archive output tracks by particular artists or albums.
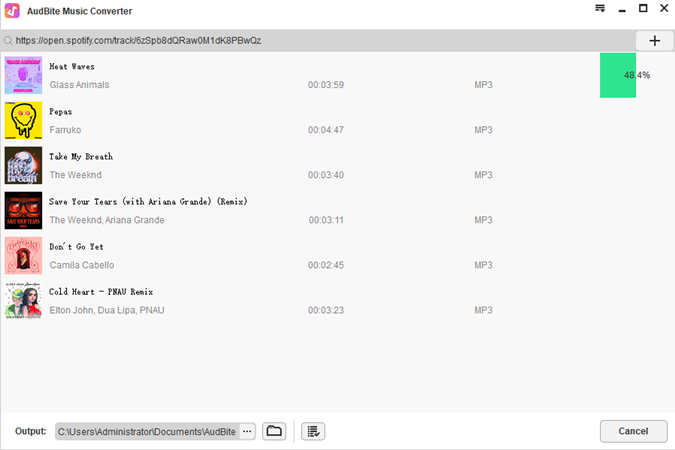
Step 3 Convert and download Spotify music
All you need to do now is to click on the Convert button. The time required for a complete conversion depends on how many tracks or playlists you want to download. Once the conversion is complete, you will find the tracks in the designated folder on your device. Click on the Converted icon to see the track and find the folder where the converted files are saved.
Part 2. How to Add Spotify Songs to Final Cut Pro
Now that you have your songs in the Final Cut Pro version, the next thing to do is edit Spotify music in Final Cut Pro. As long as you can access the folder for the converted songs, you are an inch close to adding the converted Spotify songs to Final Cut Pro. The following steps will teach you how to move Spotify music to Final Cut Pro.
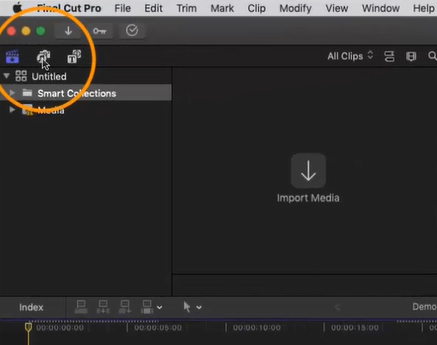
Step 1 Click on the Photos and Audio sidebar
Click on the Photos and Audio icon at the top-left corner of the Final Cut Pro interface. Select Windows > Go To > Photos and Audio to import songs.
Step 2 Add Spotify songs to Final Cut Pro
From the Photo and Audio option, click on music to choose the songs you want to add to the software. You may also choose to add sound effects from the Photos and Audio sidebar by clicking on Sound Effects > Final Cut Pro Sound Effects > Impact & Crashes.
Step 3 Upload Spotify songs to Final Cut Pro
This is the last step, then you are good to go. It is time to preview and select Spotify music. Once done, move Spotify music to the timeline of your video editor, then click on the Music Pop-up menu to select the playlist or track you wish to display.
Part 3. Conclusion
You see, most of the things you want, especially when it has to do with creativity, are on the other side of ignorance. All you need to do is to seek the right knowledge. All you need to add Spotify music to Final Cut Pro is to use third-party tool like AudBite Spotify Music Converter, and you are good to go.


