Windows Media Player is the first media player and media library application developed by Microsoft. It allows users to view photos and play CDs or music. Also, you can burn audio to CDs and organize your music collections on it. Since most people use music streaming platforms to listen to songs nowadays, it’s in high demand to import desired tracks from Spotify to Windows Media Player for permanent saving and playback. If you are struggling with doing it, then you can’t miss this article. It introduces the most helpful method and the exact guidance so you can follow bit by bit.
Part 1. Can I Play Spotify on Windows Media Player?
We are sorry to tell you the answer is negative. As the most popular music streaming platform in the world, you are able to acquire millions of songs and other content on Spotify. However, all the content can only be played within the Spotify app. Even though you have a premium account, your downloads from Spotify are all cached files that have DRM protection. You are not able to move and play it on Windows Media Player. If you do want to know how to transfer music from Spotify to Windows Media Player, we are here to offer one efficient method for you.
Part 2. How to Add Spotify Songs to Windows Media Player
To decode the music and remove DRM protection successfully, you need to use a third-party program to convert Spotify OGG Vorbis to common audio formats. You can try AudBite Spotify Music Converter, which is a professional program with powerful functions. It has the ability to download Spotify songs, playlists, podcasts, and audiobooks to your computer without the requirement for a premium account. Moreover, it supports popular output formats such as MP3, AAC, FLAC, WAV, etc.
With its assistance, you just need to simple steps to add Spotify to Windows Media Player for listening. First, download music you want from Spotify to your local computer. Second, transfer the downloaded music to Windows Media Player. After the transfer, you can also burn Spotify music to CD.
Main Features of AudBite Spotify Music Converter
- Download ad-free songs from Spotify without premium easily
- Convert Spotify music to MP3, AAC, WAV, FLAC, M4A, M4B
- Save Spotify music up to 320kpbs and with ID3 tags retained
- Support downloading Spotify music in batch at 5× faster speed
2.1 Download Spotify Music to Computer
Step 1 Decide the music you want to download
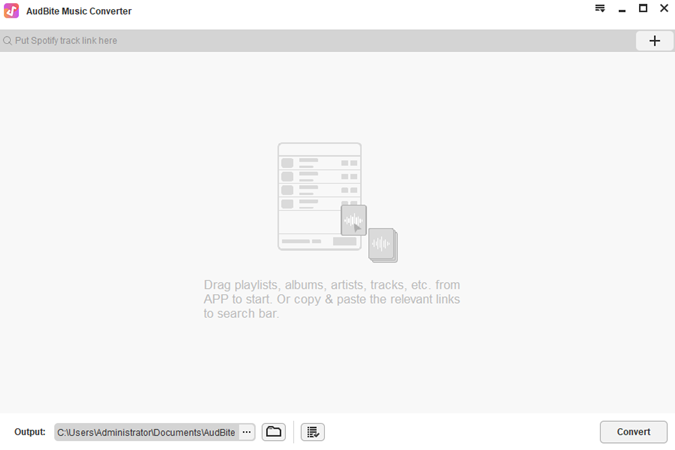
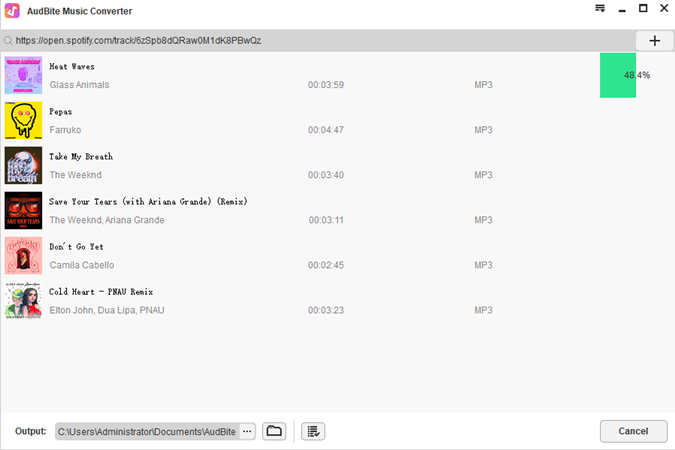
First of all, you need to install the AudBite Spotify Music Converter and the Spotify app on your computer. When you launch the program, Spotify will open automatically. Then you can log in your account. After you decide which song you desire to download, you should click the … icon, and choose Share – Copy track link. Then go back to the program and paste it into the top search bar. Click the + button, and you will find the song listed below in the interface. Or you can directly drag and drop the song to the program. This way can help you add many songs at once.
Step 2 Choose one suitable output format
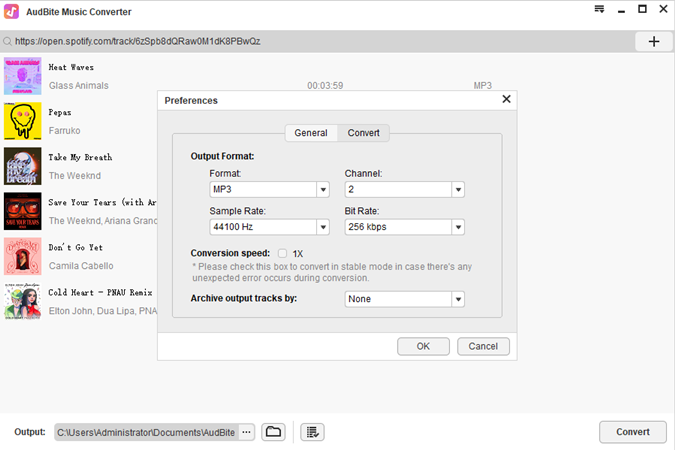
In order to play Spotify music on Windows Media Player, you should choose one audio format that is compatible with it. Navigate to the menu section of the program, and click Preferences – Convert. There are various formats you can choose from the drop-down list. If you want, you can also customize other settings like the channel, sample rate, and bit rate.
Step 3 Start to download Spotify music
Since all the preparations are done, now you can start the download process. All you need is just to click the Convert button, which is located at the bottom of the program’s interface. Then a green bar will show next to each track. It reminds you when the process is finished. In case you don’t know the storage location of the music files, you can click the Converted icon to trace the output path on your computer.
2.2 Transfer Downloaded Spotify Music to Windows Media Player
1) Launch Windows Media Player on your computer. If you can’t find it, just enter its name in the Windows search bar and open it from the search results.
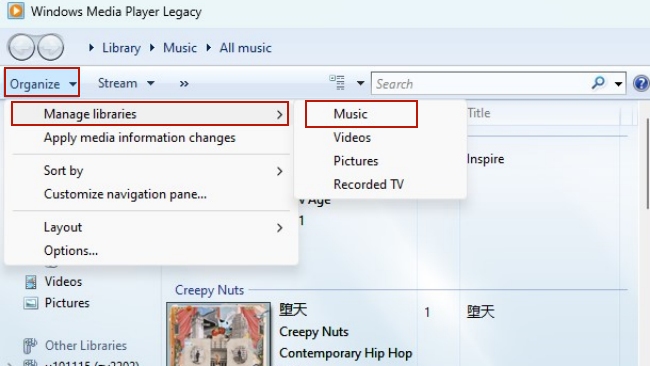
2) On the top left corner of the Windows Media Player, you can find Organize, just hit it.
3) Then choose Manage Libraries – Music.
4) Click Add and find your target file that contains Spotify music on the new pop-up window.
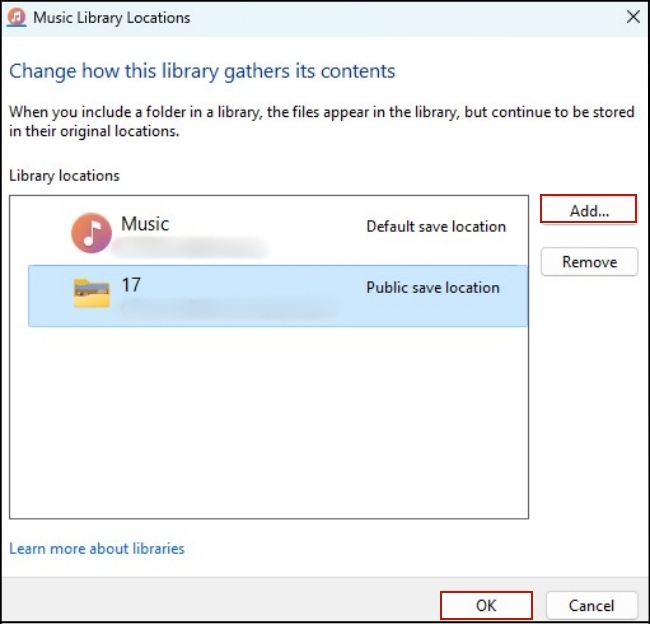
5) Once you choose the correct folder, click OK and it will be added to Windows Media Player for playback. Then you can enjoy your Spotify music on it offline.
Part 3. FAQs about Windows Media Player
Q1: How to import Windows Media Player playlists to Spotify?
A: If you want to import your local music from Windows Media Player to Spotify, here’s the extra tip. Follow the steps below and you will get it.
1) Launch the Spotify app and log in to your account.
2) Go to the Settings section and scroll down to click Library – Show Local Files.
3) Then click Add a source. You can choose the playlists you want to add to Spotify and play it freely.
Q2: Which operating system is Windows Media Player available on?
A: The original Windows Media Player supports systems like Windows NT 4.0, Mac OS 7, Mac OS X, and Solaris. It is included with Windows 9x, Windows 3.0 MM, Windows 3.1, Windows XP, Windows Vista, Windows 2000, Windows ME, Windows 7, Windows 8, Windows 8.1, Windows 10, Windows 11, Windows CE, Windows Mobile, Mac OS 8 and 9. (The new Media Player supports Windows 10 and Windows 11.)
Q3: What audio formats are supported by Windows Media Player?
A: The default file formats supported by it are WMV, WMA, ASF, and WPL. (The new Media Player supports MP3, FLAC, AAC, M4A, WAV, and so on.)
Part 4. Conclusion
Windows Media Player is a great player for you to use on a computer. If you want to enjoy your Spotify music on it, you can follow the method mentioned above. I believe that after reading this article, importing Spotify to Windows Media Player will not bother you anymore. In addition, this article also offers you the method to add Windows Media Player tracks to Spotify. You can now freely choose the music player and enjoy your music.


