Today, many people still ask how to transfer Spotify music to iTunes library. Due to the limited formats supported by iTunes and the encryption technology that Spotify has set up to protect all of its music, users, whether you have a premium or free account, cannot directly transfer music from Spotify to the iTunes library. If you want to achieve it, then what we share here is helpful for you.
- Part 1. How to Convert Spotify Music to iTunes-supported Format
- Part 2. How to Transfer Spotify Music to iTunes Library
- Part 3. How to Import iTunes Library to Spotify
- Part 4. Conclusion
Part 1: How to Convert Spotify Music to iTunes-supported Format
As we all know, iTunes is a stream media library that supports WAV, MP3, AAC, and AIFF audio formats. So the first step is to convert Spotify music to iTunes-supported format by a third-party tool.
Here AudBite Music Converter is strongly recommended. This music converter for Spotify supports converting Spotify music into MP3, AAC, WAV, M4A, M4B, and FLAC. Besides, after all Spotify songs are converted, you can block ads without premium, and play and listen to music offline on multiple players or devices, including iTunes. Moreover, the converted music from Spotify won’t lose any original quality, including transferring Spotify music to the iTunes library. Most importantly, it supports 5x conversion speed, which you can save more time.
Main Features of AudBite Spotify Music Converter
- Download ad-free songs from Spotify without premium easily
- Convert Spotify music to MP3, AAC, WAV, FLAC, M4A, M4B
- Save Spotify music up to 320kpbs and with ID3 tags retained
- Support downloading Spotify music in batch at 5× faster speed
With this powerful tool, you can remove Spotify’s encryption protection from songs and convert Spotify music to audio formats supported by iTunes. Below are the steps.
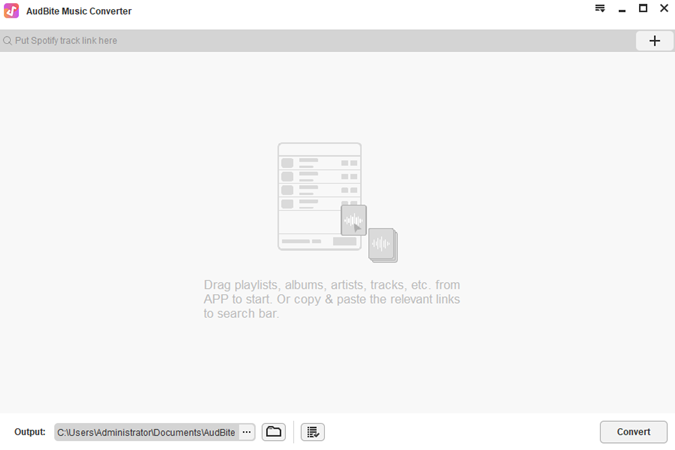
Step 1: Open and Import Spotify Music to AudBite Music Converter
Once opened, the latest Spotify app will pop up automatically. Drag or copy links of Spotify songs to the Input area.
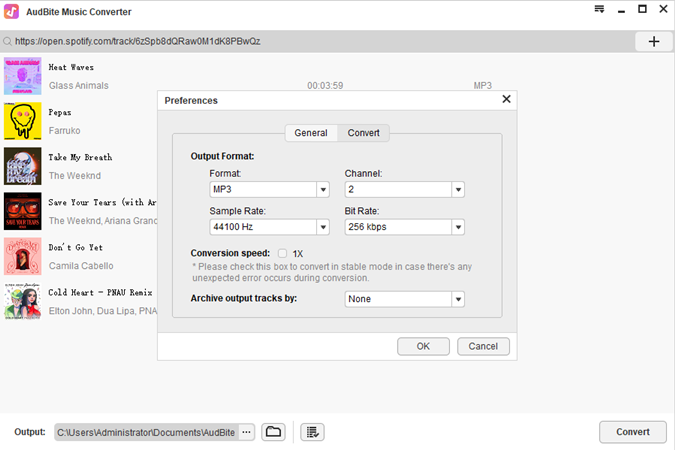
Step 2: Set the Output Format Supported by iTunes
Click the Menu option. Choose the Preference choice and click it. Set the Output Format (only MP3, AAC, and WAV can be set for iTunes), other formats can be set according to your taste. Finally, click the OK button.
Step 3: Download Spotify Music
Please click the Folder icon, and select a file that you want to preserve your downloaded Spotify music. Click the Convert button. Then you can download Spotify songs without premium and see the process of every song.
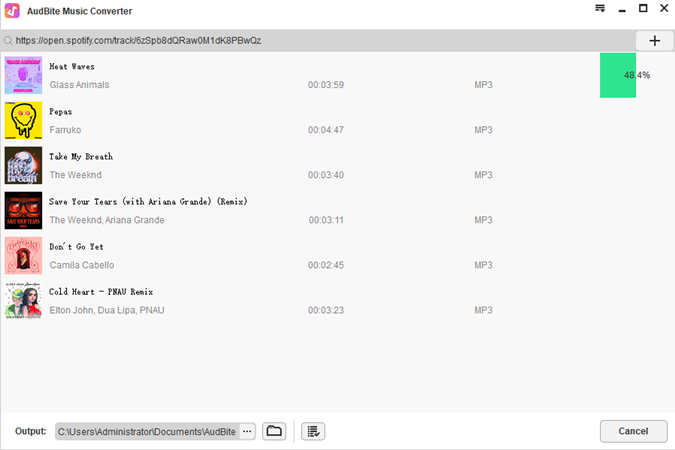
Part 2: How to Transfer Spotify Music to iTunes Library
After downloading Spotify music that you want to transfer to the iTunes library via AudBite Music Converter, here are methods to tell you how to add music files to the iTunes library.
Method 1: Add Spotify Music to iTunes Library via Drag-or-drop
Open the folder where your downloaded Spotify music files save and directly drag them to your iTunes window. Then all this music from Spotify can be shown in the iTunes library’s list for you to play.
Method 2: Import Spotify Music to iTunes Library via Local Selection
The second method is slightly more difficult than the first one, but it is also easy to follow.
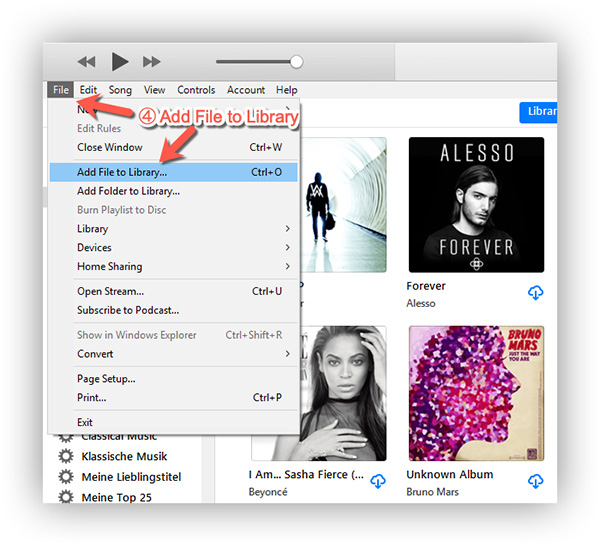
1): Open iTunes on your computer and find the Music option.
2): Click the File option at the top left corner and select Add File to Library.
3): Find the file that you preserve all downloaded Spotify music on your computer. Click the Open button.
4): Then all Spotify music will be transferred to the iTunes library.
Part 3: How to Import iTunes Library to Spotify
It is also necessary for you to learn about how to transfer your iTunes library to Spotify because not all songs from iTunes can be imported to Spotify directly or some songs in iTunes can’t be found in Spotify. Two methods will be enough.
Method 1: Import iTunes Library to Spotify via TuneMyMusic
TuneMyMusic is a platform that supports transferring sources (including music) from one player to another. But you can finish this process only online. Here are the steps.
1): Open your iTunes on your computer. Click the File icon and select Library > Export Playlists.
Note: Here you have two ways. One is to set the file format as .xml and export it to your computer, another is to copy iTunes links.
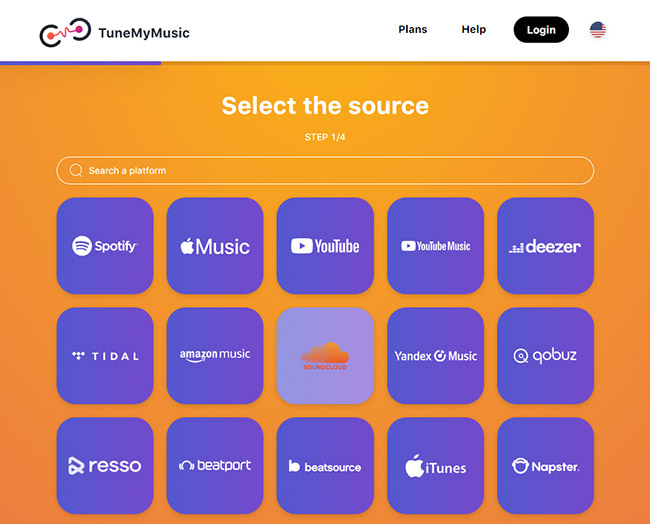
2): Open TuneMyMusic’s official site. Click the Let’s Start button.
3): Select the iTunes icon as the source and click it.
4): In this interface, you will see two options. You can choose Import from iTunes XML or Load from URL.
5): Click the Selection Destination option and hit on the Spotify option.
6): Sign up for your Spotify account and click the Start Moving My Music button to wait for a few minutes to finish this process.
Method 2: Import iTunes Library to Spotify via Soundiiz
Soundiiz is a platform that can transfer music and recreate your music collection across music services. For free users, you can transfer music for the first time, but if you want to transfer more times, you need to subscribe to it. Below are the steps.
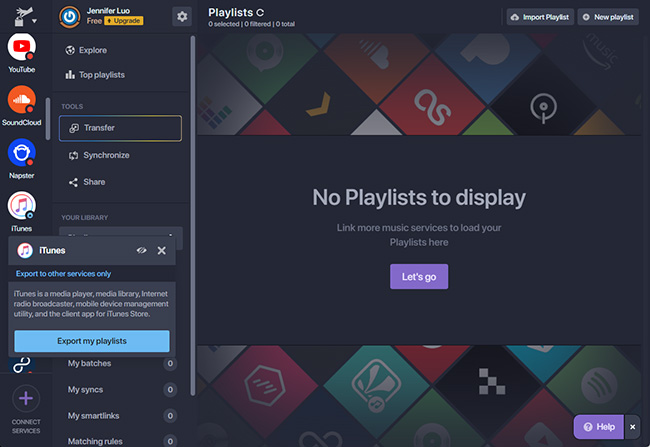
1): Open your iTunes on your own computer and select all music from the iTunes library that you want to import to Spotify.
Note: Here are two ways. The first is to copy and share links to songs; the second is to preserve all songs in a file and export it to your computer.
2): Open Soundiiz on its official site. Sign up for it. Then click the Let’s go button.
3): Find the iTunes icon on the left side of the interface and click it.
4): Click the Export my playlists. Then it will pop up an interface with two options. You can copy links of songs from the iTunes library and then click the Upload icon, or you can click the Select .txt file and locate the music file preserved on your computer.
5): Log into your Spotify account. Then you can import the iTunes library to Spotify.
When finished, then your iTunes library will be imported to Spotify via Soundiiz.
Part 4: Conclusion
In this article, no matter whether you want to know how to transfer Spotify music to iTunes library or import iTunes library to Spotify, different conditions have two means respectively. For the first condition, a music converter is necessary because you need to notice the output formats that iTunes supports, and AudBite Music Converter is recommended here. If you meet any problems, please make comments below, and we will try our best to solve your problems.
